Friday, October 19, 2012

Southern Gothic - a Halloween Post


It was a dark and stormy night, the wind howling outside the studio as I hunched over my drawing board.  A faint "tap-tap-tap" broke my concentration, and I looked up to see two spectral figures illuminated by the gaslight outside the front door.  I recognized them as neighbors and welcomed them inside.  After a restorative toddy, they related their tale of woe...

They resided with their two sons in a South Austin bungalow that had seen better days.  The ceiling was falling into the kids' bedroom, and to use the bathroom was truly to commune with nature.  They needed more room and a drastic remodel of their house was in order.  Could I help? 

 
It was a perplexing riddle, until I became aware of the clients' deep and abiding adoration of Halloween.  To these neighbors, All Hallows Eve was like Christmas, the 4th of July, and Thanksgiving combined.  One word was all the inspiration I needed: Beetlejuice!


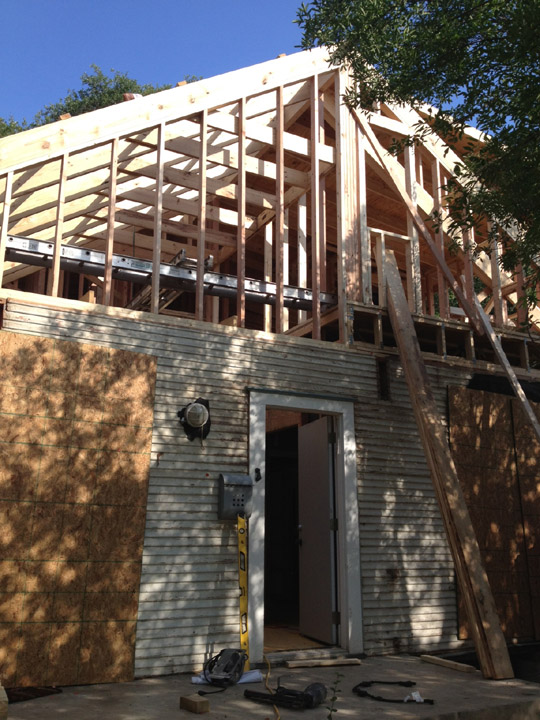
We decided to give the non-descript bungalow some Southern Gothic style.  One of the goals of the project was to add a couple of bedrooms upstairs for the boys.  By giving the roof a steeper pitch and adding some dormers, we were able to gain space on the second floor without building an entire second floor.  The stairs would go inside a tower with a widow's walk above it.


 It was an enjoyable project to work on, and Melynn Mayfield (my intern at the time) had fun with the renderings.  Alas, funding became an issue and the design was put on hold.  Hopefully someday we'll be able to see the project through construction... until then, Happy Halloween!


Thursday, August 23, 2012

Une Petite Maison -- All Dried In

After the framing was completed and the wall sheathing and roof decking installed, we were ready to install the windows.  All of the new windows are Andersen 100 Series, with a few exceptions.  The 100 Series is a composite vinyl window made of recycled material.  On the north side of the house downstairs, we were required by code to use aluminum-clad windows since our house sits over the setback (a fire concern, apparently).  The corner windows are custom aluminum windows made by Joe Gaspard at Groove Glass.  Joe and I have worked on quite a few projects together, including the Yaspar Residence and the Zilker Treehouse.


Prior to siding, the metal roof was installed.  Ed Hayes of ATX Metal Roofing installed a galvalume snap-lock (hidden fastener system) metal roof, which looks great.  I've worked with Ed on a number of projects in the past, and he and Joe Hopkins (framing) worked well together.  We had hoped to reuse some of the old metal panels that came off the carport, but in the end it was easier to go with new panels, so we gave the old roofing material to our concrete crew.


Shortly after the siding started, the framing crew had to leave town for Nebraska.  I had hoped to have the siding finished before they left, but it had to wait until just a few days ago, after a 2-week break.  We have two different sizes of smooth hardi plank siding-- a 4" exposure to match the back of the house, and an 8"exposure.  Unfortunately I came home one day to find that the entire second story had been clad in the 8" exposure (which is not the way it was drawn up).  I was concerned it would make the house look a bit top-heavy, but in the interest of keeping things rolling I let it slide.  I think it will look fine once it's all painted.


We passed our rough inspections with flying colors and were ready to insulate.  Felix de Leon and Done Right Insulation stapled cocoon-like sheeting over the framing prior to blowing in rockwool insulation.  It made the whole house look like it was covered with a spiderweb.


The roof insulation is open cell foam, sprayed out of a hose connected to a machine in the truck outside.  Haz mat suits not strictly required, but recommended due to the adhesive nature of the foam...


The open cell foam expands to fill the rafter cavities.  Besides insulating against heat gain, it's a good acoustical insulation as well.


Here's a view into the front room, over the stack of sheetrock awaiting RC Brown's drywall crew.  Beckett had some fun climbing on and over the obstacle...


In this photo you can see the "rockwool" insulation in the wall cavity and the open cell foam at the roof.  At this point, I am way behind in posting progress photos... so will try to catch up in the next couple of days, since the project should be wrapping up in about 4 weeks.


Thursday, June 14, 2012

Une Petite Maison - Concrete Pour


I'm a few weeks behind but wanted to post some photos of the concrete pour.  There are some mistakes in residential construction that are relatively easy to fix... concrete, not so easy.  So I was a little bit worried.  The concrete subcontractor had the forms up quickly for the laundry room addition, but I noticed it seemed a little small.  Yep, 9'x6' instead of 9'x9'.  They had to dig another beam trench and reset the rebar.


Once that was corrected, they formed up the front porch extension.  I checked the dimensions the evening before the concrete pour and-- oops-- 2' too long.  Fortunately they were able to correct that before the concrete truck showed up the next day.  Once the truck arrived, it sat across the street for a few minutes, growing a "tail"...


When the chute was sufficiently long, the truck backed up the driveway as the concrete crew used a 2x8 to lift branches out of the way.  Once the truck was in place, they directed the chute over the porch formwork.


Then the driver let 'er rip, and the mix started to fill the formwork as the workers aided the flow over the rebar and compacted it.


I went upstairs for a bird's-eye view...


After the porch was done, the truck backed up a little more to access the laundry room formwork.  It didn't take long to complete the pour, after which the workers spent some time smoothing it out with steel trowels.  I had spent some time earlier laying out the anchor bolt placement and marking it on the formwork-- the anchor bolts are J-shaped bolts that get placed in the concrete with about 2" sticking up from the top of the slab.  Once the slab cures, the sole plate (framing bottom plate) is marked for the bolt locations, drilled, and placed over the bolts.  Washers and nuts tighten the plate down to the slab.


This was more of a concern though.  The photo above shows the T-shaped steel plates I designed to connect the porch posts (Douglas fir 8x8s) to the concrete porch.  Two of the plates were expansion bolted into the existing porch, but the other two had to be set in the right location.  Fortunately I was there because the concrete contractor initially set them rotated 90 degrees, a mistake that I caught and corrected right away.  The next step was to notch the columns, which the framers did with an electric chain saw.  Then the columns were slipped over the steel plates and through-bolted (the plates were pre-drilled).  

 
It ought to hold up just fine-- the columns sit about 2" above the porch to minimize potential damage from rot.  Each plate weighs about 20 pounds and is welded out of 1/2" steel plate.  Next up, more framing, windows and roofing...


Thursday, May 17, 2012

Une Petite Maison - Framing Begins!

It's been a few weeks since I last posted, and there's been a lot of progress!  I have also quit drinking coffee in an attempt to manage my stress levels.  After months of sunny skies and drought-like conditions, the skies opened up once we had the roof off.  First the trusses went up...


It was great to see the construction progress, and by the end of the day I could stand on the second floor decking, with views of the trees and a few downtown (and neighboring) buildings.


The framing crew secured the tarp over the top of the trusses, but an epic storm hit and dumped nearly three inches of rain in the Austin area... some of which ended up in the family room.  I didn't take pictures of that, but we spent Sunday morning hauling a waterlogged rug and all of our furniture out into the yard to dry out.  Fortunately I don't think there's any long term damage, and Joe and Nick came right over on Sunday to help out.  Despite the rainy forecast, the crew managed to start the roof framing on Monday.


With the rafters framed, the tarp performed better and while there was still some rain that got in, the back of the house stayed dry.  The framers were able to work under the tarp as the rain continued.  The house still looks like a wreck from the outside but hopefully that will be remedied in the next couple of weeks...


It's been fun to see the upstairs take shape and to get a sense for how the rooms will feel.  There are two bedrooms, a bathroom, and a music room-- the music room will have a "Scooby Doo bookcase" entry, which I have been promising the boys for years.  I'm particularly happy with the view of the live oaks and bamboo out the corner window of the music room.  In this photo you can also see the roof over the family room and master bedroom.  We have relocated the furnace to the adjacent attic space, so all of the ductwork will run from there to the other rooms of the house.


I know in my head what all of this will look like, but it's hard to physically envision it right now.  Plywood covers the ground floor openings and not all of the windows are framed in.  Here you can see the old "teardrop" wood siding, which will essentially act as sheathing for the house.  We'll go over that with building paper and plywood strips, then hardi plank which will be painted a dark gray-blue color ("Ocean Floor" by Benjamin Moore).


Despite my best planning, the live oak limbs were still a bit too close to the new roof.  Whitney Rasco, local arborist and master storyteller, came over to do some minor trimming to prevent angry roofers from taking a sawz-all to any limbs.  The back bedroom has a great view of the trees-- you can see the small 2'x2' window tucked under the gable in this photo.  Beckett's old bedroom (on the ground floor) is getting new windows and will be an office.


One of the biggest challenges of the project so far has been keeping my little parkour afficionado from using scaffolding and open framing as a jungle gym...


Tomorrow should be a busy day, with exterior sheathing and some windows going in (fingers crossed)...

Thursday, May 3, 2012

Une Petite Maison - Demolition!

Demolition started on Monday, and has proceeded with amazing speed.  Corbin and Beckett got a tour of their old house when they arrived home from school. The front half of the roof had already been removed, and a blue tarp made the house look like a big tent.


The interior finishes were also removed.  In Central Texas cottages of this vintage, the typical construction was 2x4 framing with 1x6 "shiplap" pine on the interior.  A cloth would then be tacked to the interior siding, and wallpaper hung on the cloth.  Here you can see remnants of the original wallpaper.  The shiplap interior siding acts as a diaphragm to strengthen the building, so we're leaving it in place.  It will eventually be covered with sheetrock.


Ashley was very surprised to walk in the front door and see all that had happened in a single day...


By the end of the day the trash pile in the front yard was getting intimidating.  Unfortunately our lot doesn't have a good location for a haul-off dumpster, and the site-built 8'x8' square container failed to contain the mountain of debris...


While Joe Hopkins and his able crew were moving forward with demolition, Nick Bell of NSB Builders framed a temporary wall between the front of the house and the back.  I've worked with both Joe and Nick before-- Joe framed the Yaspar Residence in 2005, and Nick has contracted two projects for me, the most recent of which I'll be posting soon on my website.


Steven Kruse of Modern Electric has cut power to the front of the house, and installed our temporary electrical pole in the front yard.  Once the addition is framed up he'll start pulling the new wiring.


We'll move into the back of the house at the end of May, at which point the addition should be "dried in" and the work will be less disruptive.  We're currently living across the street at Jason and Tara's SoCo rental.  The scene in the backyard is much more peaceful than the view of our front yard.


By the end of the day today, I had come to the full realization that this project is nothing short of a complete reconstruction of the existing cottage.  Perhaps it was when I unlocked the door and saw this...


All that remains of the original cottage is the exterior (and a few interior) walls, and the original oak flooring, now protected by yellow corrugated plastic.  Tomorrow the new interior walls will go up, as well as the second floor trusses and decking. 

 
In the meantime, we have a nice "open air" shower...


Tuesday, May 1, 2012

Une Petite Maison - Foundation Work

Foundation work started last Tuesday.  A crew from Douglas Foundation Repair showed up early and started by removing the skirting around the base of the house, so that they would have access to the crawl space.


When the house was built around 1935, the typical foundation consisted of cedar tree trunk piers.  Cedar is weather and rot-resistant, and a plentiful building material in Central Texas, and these cedar piers have done the job for almost eighty years.  These days, however, cedar piers are not recommended and it's a good idea to replace them with concrete piers, especially if the house will be under additional loading from a second story.


The workers used heavy-duty jacks to lift the house incrementally and level it to its original state.  One corner of the dining room was 3" lower than the corner diagonally opposite, but after leveling it doesn't feel like a "fun house" anymore.  Wood block cribbing was placed under the beams to support the weight of the house as the piers were excavated and removed.  The crawl space under the house is pretty tight, and there is probably less than 12" between the bottom of framing and grade at the back of the house.  The guys had to tunnel toward the back in order to have access to the piers.  New holes were dug for the 24"x24"x12" concrete footings to support the concrete piers.


Despite cedar's durability, most of the piers had experienced some rotting (especially the portions below grade).  The northwest corner of the house also had some damage to the wood beams due to a leaky hose bibb.


Next the workers set cardboard "sonotube" forms on top of the concrete footings.  The footings had rebar extending vertically to tie into the piers.  The cardboard tubes were filled with concrete and the new foundation is in place!  Note the shiny new hose bibb that has replaced the leaky culprit...


Sometime this week the guys will come back to remove the cardboard forms and the cribbing.  Demolition has begun!


More to come soon...


Tuesday, April 24, 2012

Une Petite Maison - the project begins!


We bought our little house in South Austin in 1998, fresh out of graduate school.  We were living in Clarksville at the time and we loved the area, but couldn't find anything in our price range.  When Ashley's mom heard we were going to pay $108,000 for an 820-square-foot cottage that needed work, she thought we were crazy.  The house had been a rental, inhabited by a man with an apparently incontinent cat.  Fortunately there were some nice oak floors under all the stained carpet, and we managed to fix it up pretty well over the next few months.

The day we closed on the house, the porno theater on the corner closed (photo above of its transformation into office space by Miro Rivera Architects).  Back in those days, South Congress was still a bit seedy, and the Hotel San Jose rented rooms by the hour.  Needless to say, the neighborhood has changed a bit.  Though we are technically in Bouldin Creek, we're part of an island between South First Street and South Congress, and our neighborhood definitely has more of the SoCo vibe.


We added on to the house in 2002, when our first son Corbin was two years old.  I contracted the project, which consisted of a 700-square-foot addition that contained a family room, master bedroom and master bathroom.  We also remodeled the kitchen, doing a lot of the work ourselves.  We just recently decided to expand again, and now we're in the process of moving 14 years worth of accumulated junk out of the front part of the house (the original cottage) so that we can get the project started.

The first step was to obtain a "life safety permit" which is required when previous work has been done without a final inspection.  Unfortunately, that was my fault-- we were in a hurry to finish up the first addition so that my parents (who were coming from Singapore) could stay with us.  So 10 years after the fact, we got our final inspection.  We also needed to obtain a tree permit-- we have two large live oaks in our back yard, and any tree over 19" diameter is considered a "protected" tree, subject to inspection by the City Arborist prior to the start of a construction project.  Fortunately our addition will be almost entirely above the existing house, so it won't affect the critical root zone of either tree.

We have been getting bids from subcontractors and we started the project two days ago.  The first task was to remove the asbestos shingles that were put up over the original wood siding.  It only took about four hours and the work was performed by CAP Construction, a San Antonio company certified for asbestos removal and transport (suits, masks and all).  Here's what the house looked like afterwards:


Now we can see the original wood clapboard siding, painted white.  There's still some black felt paper on the house which we'll remove soon.  Next up: foundation repair!

Friday, March 30, 2012

Zilker Kitchen Remodel


old kitchen

When Shelly and Colin initially approached me about a kitchen remodel, we didn't realize quite how extensive the project would be.  The existing kitchen was a small space at the front of the house.  It was cozy but definitely needed some updating.  After we discussed the project goals, a new plan for the kitchen began to take shape.

Shelly provided a detailed "master plan document" that described project goals and concerns.  The main priority was an updated kitchen, with secondary goals that included a more usable sunroom, a dedicated entry and/or mudroom, and separate living areas for TV viewing and relaxing.  


old living room

The question was whether to renovate the existing kitchen or build a new kitchen elsewhere in the house.  The downstairs rooms did not function particularly well, mainly because there were three living spaces "enfilade"-- each room led into the next and none of them had a clear identity.
It didn't take long for us to decide that the best option would be to relocate the kitchen to the center of the house.  That would allow the first living space to be the primary living space, with a view and access to the kitchen, which then would lead through to a new dining room with access to the deck and back yard.  This meant that the old kitchen could become a small media room.


The new kitchen is separated from the front living area by a bar counter with built-in storage above it and to either side.  The bar counter and the countertop below it (with downdraft range) are black silestone.  White-painted cabinets help reflect light and unify the space, while maroon marmoleum provides an easily cleanable backsplash.


stairs before


Shelly and Colin were a bit concerned about the stairs coming down into the kitchen.  We designed a storage and display "hutch" against the balusters to help define the edge of the kitchen, and took advantage of the space under the stairs for yet more storage.  We also opened up the doorway an additional three feet to diminish the separation between the kitchen and the dining area beyond.


former sunroom


The dining room (formerly the sunroom) served as a catch-all space for laundry and was really only part of the circulation to and from the adjacent laundry room or the back yard.  A red island with a butcher block countertop (affordably purchased from IKEA) now helps to define the kitchen work area, so that anyone wanting to move from one room to another won't be in the way of the chef. 


We anchored the space by adding built-in seating and yet another free-standing piece of furniture cabinetry.  This was something that Shelly had planned for all along: the toast and coffee center.  With the fridge immediately adjacent, it provides a way to quickly and easily get a caffeine fix without interrupting breakfast preparation.  We designed it to fit neatly beneath the existing windows and to provide a nice termination for the built-in seating.  


As for some other items on the wish list... it was a bit of a challenge to add a new entry hall, but we were able to borrow a few feet from the guest bedroom to create a nice hallway with a door out to the driveway.  We also borrowed a bit of cabinet space from the adjacent guest bathroom to carve out a family locker area.  Painted perforated locker doors allow air to circulate to the shelves behind them, while drawers beneath stow everything from dog leashes to baseball gear.  

And the old kitchen?  It was transformed into a "media lounge" with fluted glass barn doors to separate it from the main living area.  It's now a cozy place to read or watch a movie. 


Roger Wintle of Texas Trim contracted the project and did a fantastic job throughout.  Paul Wintle built all of the cabinetry and served as general problem-solver.  All photography of the completed project is by Whit Preston.  Thanks to Shelly, Colin, and everyone involved!